I recently wrote a quick ANT script to deploy a personal Zend Framework project and thought I would share the code. If you are just getting started with Agile development, ANT builds/deployments are a great first step with immediate benefits. The following example is bare-bones, it does not run tests or do anything complicated but it should give you something that works and can be built upon.
Methodology
For my project I need ANT to do the following:
- Checkout From Subversion HEAD Or A Specific Revision Of The Project
- Remove Files That Should Not Go To Production (Documentation)
- Configure Zend For The Correct Environment
- Securely Transfer Code To Production Server
I think this is a very common use-case so… onto the code!
Pre-Reqs
- Apache ANT
- SnvAnt - Provides Subversion Interface To ANT
- JSCH Jars - Provides SCP To ANT
I am using Zend 1.10. In this example the only Zend dependency is using Zend_Application with production/development sections in your application.ini file.
Setup Zend
Setting up Zend is the easy part. We need a folder within our project to hold two files:
- build.xml - the file that contains all the ant tasks
- build.properties.prod - the file that contains the properities required by build.xml
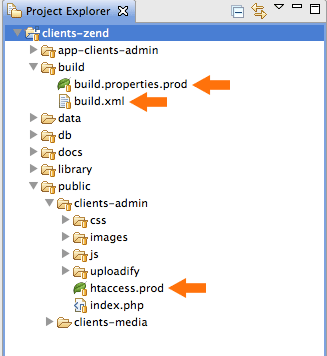
We also need a .htaccess file that will be used in production. The important part of this file is APPLICATION_ENV, this value is used by Zend to determine what environment it is in and what settings to use from your application.ini file.
Simply copy the .htaccess file that is already there, and rename to htaccess.prod. Edit the file and change SetEnv APPLICATION_ENV development to SetEnv APPLICATION_ENV production.
The below screenshot shows how I have set things up. Orange arrows are the important parts.
build.properties.prod
Below is my example properties file. Included are settings for:
- Locations of Subversion Jar Files
- Subversion Login Information
- Temp File Locations
- Path To Comment File
- Production Server Information (user/pwd are entered a runtime)
The path to the comment file is where we will instruct ANT to insert the version information and timestamp. This allows us to “view source” on the production site and see the revision information and date/time of last build.
You need to customize all values for your own environment, the comments within the file should help explain what you need to do.
# -----------------------------------------------------------------------------
# build.properties
# This file is referenced by the  build.xml file.
# -----------------------------------------------------------------------------

# -----------------------------------------------------------------------------
# External jars needed for Subversion
# Example:
# lib.dir=/usr/local/ant/lib
# svnant.jar=${lib.dir}/svnant.jar
# svnClientAdapter.jar=${lib.dir}/svnClientAdapter.jar
# svnjavahl.jar=${lib.dir}/svnjavahl.jar
# -----------------------------------------------------------------------------

lib.dir=/usr/share/ant/lib
svnant.jar=${lib.dir}/svnant.jar
svnClientAdapter.jar=${lib.dir}/svnClientAdapter.jar
svnjavahl.jar=${lib.dir}/svnjavahl.jar

# -----------------------------------------------------------------------------
# Subversion Login and URL
# Example:
# svnant.repository.user=username
# svnant.repository.passwd=password
# svnant.project.url=svn://XXX.XXX.XX.XX/path/to/project
# -----------------------------------------------------------------------------

svnant.repository.user=username
svnant.repository.passwd=password
svnant.project.url=svn://path.to.your.repo.project/trunk

# -----------------------------------------------------------------------------
# Build Folder Locations
# Example:
# temp.dir=temp
# build.dir=release
# -----------------------------------------------------------------------------

temp.dir=/temp/scratch
build.dir=/temp/release

# -----------------------------------------------------------------------------
# Comment File Location, Where we output revision information requires tokens
# in file: @build-revision@
# -----------------------------------------------------------------------------

comment.file.path=/your-app/views/scripts/common/footer.phtml

# -----------------------------------------------------------------------------
# Deploy Location and Login
# Example:
# deploy.server=sugababes.com
# deploy.path=/path/to/directory
#
# -----------------------------------------------------------------------------

deploy.server=productionserver.com
deploy.path=/full/path
build.xml
Contained within the build XML file are all the tasks used by ANT. First the tasks we will actually run:
- build-release : checksout and builds release (good for testing without sending to production)
- deploy-release : deploys release and expands on target server
- build-deploy : a short cut that builds and releases to production in one step (most commonly used)
The above relies on the following ANT tasks to do the actual work:
- clean : clean up from any previous builds
- checkout : checkout project from subversion
- cleanRelease : removes folders that should not be deployed (documentation, the build folder)
- populate : copy and rename the correct htaccess file, remove old one
- revision : find token in file, replace with revision number and date/time stamp
- zip release : compress file
- deploy : use scp to transfer zip file
- extractConfigure : delete existing files on target server, extract zip file on target server.
<?xml version="1.0"?>
<project name="DevPatch Client App" basedir="." default="usage">

<description>
    Build File For DevPatch Client Zend Deployment - checkout from subversion,
    cleans release, creates zip file and scp file to the correct environment.
</description>

<property file="build.properties.${env}" />

<!-- ===================================================== -->
<!-- Subversion                                            -->
<!-- ===================================================== -->
    <path id="project.classpath">
        <pathelement location="${svnjavahl.jar}" />
        <pathelement location="${svnant.jar}" />
        <pathelement location="${svnClientAdapter.jar}" />
    </path>

    <typedef resource="org/tigris/subversion/svnant/svnantlib.xml"
        classpathref="project.classpath"  />

    <target name="checkout">
        <svn username="${svnant.repository.user}"
             password="${svnant.repository.passwd}">

            <checkout url="${svnant.project.url}"
             revision="${revision}"
             destPath="${temp.dir}" />
        </svn>
    </target>

<!-- ===================================================== -->
<!-- Utility & Clean Up                                    -->
<!-- ===================================================== -->
   <target name="clean">
      <delete dir="${temp.dir}"/>
   </target>

   <target name="cleanRelease">
      <delete dir="${temp.dir}/build" />
      <delete dir="${temp.dir}/db" />
      <delete dir="${temp.dir}/docs" />
   </target>

<!-- ===================================================== -->
<!-- Replace Token In Footer With Revision Number          -->
<!-- ===================================================== -->
   <target name="revision">
      <svn>
         <status path="${temp.dir}" revisionProperty="Revision" />
      </svn>
      <tstamp/>
      <replace file="${temp.dir}${comment.file.path}"
               token="@build-revision@"
               value="Revision: ${Revision}, Built On: ${DSTAMP} : ${TSTAMP}"/>
   </target>

<!-- ===================================================== -->
<!-- Copy/rename correct htaccess file. Remove existing    -->
<!-- file                                                  -->
<!-- ===================================================== -->
    <target name="populate">
        <delete file="${temp.dir}/public/clients-admin/.htaccess"/>
        <copy file="${temp.dir}/public/clients-admin/htaccess.${env}"
            tofile="${temp.dir}/public/clients-admin/.htaccess"/>
        <delete file="${temp.dir}/public/clients-admin/htaccess.${env}"/>
   </target>

<!-- ===================================================== -->
<!-- zip release                                           -->
<!-- ===================================================== -->
    <target name="zipRelease">
        <mkdir dir="${build.dir}"/>
        <zip destfile="${build.dir}/YOUR-FILE-NAME_${revision}.zip"
             basedir="${temp.dir}" />
        <antcall target="clean"/>
    </target>

<!-- ===================================================== -->
<!-- deploy to target server                                  -->
<!-- ===================================================== -->
    <target name="deploy">
        <scp file="${build.dir}/YOUR-FILE-NAME_${revision}.zip"
            todir="${user}@${deploy.server}:${deploy.path}"
            password="${pass}"
            trust="true"
        />
    </target>

<!-- ===================================================== -->
<!-- Extract and configure on target server, delete        -->
<!-- manually everything, create data folder        -->
<!-- set correct dir permissions                           -->
<!-- ===================================================== -->
    <target name="extractConfigure">
        <sshexec host="${deploy.server}"
                      username="${user}"
                  password="${pass}"
                  trust="yes"
                  command="cd ${deploy.path};
                          rm -R app-clients-admin;
                          rm -R library;
                          rm -R public;
                          rm -R data;
                          mkdir data;
                          mkdir data/cache;
                          mkdir data/session;
                          chmod 775 data/cache;
                          chmod 775 data/session;
                          unzip -o YOUR-FILE-NAME_${revision}.zip;
                          rm YOUR-FILE-NAME_${revision}.zip;
                         "/>
    </target>

<!-- ===================================================== -->
<!-- Targets                            -->
<!-- ===================================================== -->
    <target name="build-release"
            description="Checksout and Build Release, Specify revision and environment (prod)
                         Example: ant build-release -Drevision=HEAD -Denv=prod"
            depends="clean,checkout,cleanRelease,populate,revision,zipRelease"/>

    <target name="deploy-release"
            description="Deploys Release and Expands on Target Server
                         Example: ant deploy-release -Drevision=value -Denv=prod -Duser=value -Dpass=value"
            depends="deploy,extractConfigure" />

    <target name="build-deploy"
          description="Checksout,Build, Deploys in One Step
                       Example: ant build-deploy -Drevision=value -Denv=prod -Duser=value -Dpass=value"
            depends="clean,checkout,cleanRelease,populate,revision,zipRelease,deploy,extractConfigure" />

    <target name="usage">
        <echo message="  Execute 'ant -projecthelp' for build file help."/>
        <echo message="  Execute 'ant -help' for Ant help."/>
    </target>

</project>
cleanRelease and extractConfigure is where you will likely need to do the most customizing. For example during extractConfigure I remove my data directory where I store cache/session data then re-create. This is something specific to my application.
When running the ANT targets you supply the revision (or HEAD) the target environment (just prod in the example), and the username/password for your production environment:
Example: ant build-deploy -Drevision=HEAD -Denv=prod -Duser=foo -Dpass=foobar
The env variable is used to specify which properties file to use and which htaccess file to copy. If you supplied qa, ANT would look for build.properties.qa and htaccess.qa.
Running ant -projecthelp will show you the 3 main targets and examples of their usage.